Saturday, July 27, 2013

Coriander Chutney

                                                   This Coriander Chutney, I started preparing after tasting it in the restaurants and knowing the recipe from one of the neighbours, 25 years back.

                                           Till then I used to prepare the other version called Thuvial, which is mostly made by all our family members.The thuvial is a solid form with minimum water content and stays for a longer time.
                                     
                                        The chutney goes mainly well with the tiffin items like Idli, Dosa and Chappathi and variety rice.


Coriander Chutney


Ingredients  :

Coriander leaves ( Cleaned and Chopped )    2 cups
Urad Dhal ( optional )           1 tbsp.
Green chilly        2
Oil                      2 tsp.
Grated coconut            2 tbsp.
Tamarind                small piece
Hing,   Salt

Method :

1. Soak the tamarind in warm water.

2. Heat little oil in a tawa and roast the urad dhal till it turns brown with an aroma.

3. Transfer the dhal to a plate and let it cool.In the same tawa, add little oil, add the
    hing and then the green chillies and saute for a minute.Then add the coriander leaves
    and saute well till the leaves shrink.Add the coconut and  switch off Let them cool.

4. In a dry mixi, powder the roasted urad dhal coarsely.Then add the other ingredients
    with the tamarind, salt and grind.Add some water and grind it coarsely as it is a
    chutney. Seasoning with mustard and extra hing is purely optional.

Note :  

1. Adding roasted Urad Dhal is also purely optional.Any roasted dhal gets powdered
   well only if the mixi is dry.So whenever Urad or Channa dhal has to be added along
   with the other ingredients in a mixi, normally we powder the dhal and add the other
   ingredients.

2. Half cup of Urad Dhal can be roasted , cooled and powdered in a dry mixi coarsely.
     This comes handy for any chutney and some dishes.

3. This chutney is tasty when taken fresh.So better to avoid storing in a fridge unless
    it is left over.


Friday, July 26, 2013

Vatha Kuzhambu

                             Vathakuzhambu is a popular gravy for rice in the southern districts of Tamil Nadu.It is also called as Puzhi Kuzhambu and its unique quality is that it could be preserved even for a week in those days when refrigerators were not widely used.Sambar,I feel has its own taste even with slight variations and mostly turns out to be good for every one. But this Vathakuzhambu can be a real Vathakuzhambu only if the right ingredients are used in the right proportion.
                     We always use different powders for Sambar and Vathakuzhambu, both homemade.Initially it was a surprise for me to read or watch the Sambar Powder being used in the recipes for Vathakuzhambu.Now it has become a matter of acceptance.
                   In earlier days as the name suggests, only dried vegetables like sundavthal, Vendaikkai, Kathari, Kothanvarakkai ,Manathakkali or Paharkkai vathals were used for this
gravy.Of late we started using fresh Drumsticks, Vendaikkai, Kathrikkai,Paharkkai etc.
                         
Vatha Kuzhambu
                                                                                                    

Ingredients :

Sundavathal            1/4 cup
Garlic Pods              15
Small onions            15
Sambar or Vathakuzhambu Powder   3 tsp.
Tamarind                 1 lemon size
Gingelly Oil               2 tbsp.

To grind :

Small onions       10
Curry leaves        Little


To temper   : 

Mustard,  Urad dhal,  Curry leaves

Method  :

1. Soak the tamarind in warm water and take nearly 3 cups of tamarind extract.

2. Grind the small onions with the curry leaves in the mixi.This is a purely optional step.

3. Heat 1 tbsp. of oil, add the Sundavathal, Garlic, small onions, and saute well till they
    change colour and get half cooked in the oil.
4. Add the sambar powder, onion paste, salt and turmeric powder and stir for 2 to 3 mins.

5. Add the tamarind extract and mix well.Let the gravy boil on a medium or simmering
    flame.
6. When a thick consistency of the Kuzhambu is reached, season with mustard, urad dhal
    curry leaves in 1 tbsp. of Gingelly oil which gives a rich aroma and taste.

Note  :

1. Gingelly Oil is the real taste maker of this gravy and that has to be used generously.

2. Tamarind and the oil are the natural preservatives. As dhal and coconut are not used,
    this can be stored for a few days even without the fridge.
3. Onion and Garlic can be totally avoided.

4. We always prepare this Vathakuzhambu Masala powder for nearly six months by
    roasting all the ingredients and grinding them to a fine powder in the flour mill.
    The measurements will be given in a separate post.


Friday, July 12, 2013

Vendaikkai / Lady's Finger Pachadi

                         This Pachadi variety is one of the popular Pachadi varieties of the Tirunelveli  Saiva Pillai Community.Vendaikkai and Mangai Pachadi, is another common Pachadi.The Pachadies are different from kootus, that for Pachadies we add a little extract of tamarind

Vendaikkai / Lady's Finger Pachadi

Ingredients :

Lady's Finger            20 ( 250 gms.)
Small onions            15 / 1 Big Onion
Cooked Toor Dhal                     1/2 cup
Tamarind               1 Gooseberry size
Salt, Hing, Turmeric  Powder (Optional )

To grind in the mixi :

Grated Coconut      1/2 cup
Zeera                     3/4 tsp.
Green Chilly                2
Small onions (optional )           3 / a small piece of Big Onion

To Temper :

Mustard, Split Urad Dhal,Oil, Curry Leaves.

Method :

1. Split the Vendaikkai into 4 lengthwise till the stalk without separating into 4 pieces.
    Then cut it into small pieces.Slice the onions.

2. Soak the tamarind in warm water and extract a cup of tamarind water.

3. If there is no cooked Dhal, pressure cook 1/4 cup of Toor Dhal.Grind the given
    ingredients in a mixi.

4. Heat oil in a tawa, add the finely chopped onions and saute them till they become
    golden brown.

5.Then add the sliced Vendaikkai and saute till they turn brown and get roasted well.

6. Add the tamarind water, salt, hing , cooked Dhal, coconut paste and Turmeric
    Powder.Let it boil for about 5 mins.

7. Once the Pachadi is boiled well, preferably on low fire getting rid of the raw smell
    of the tamarind and ground coconut, remove from fire.

8. Season with mustard , split urad dhal and curry leaves. The tasty pachadi is ready.

Preparation time   30 mins.

Note :

1. The green chillies and tamarind can be used as per our taste.

2. If vessels and washing the vessels have to be minimised, garnishing with mustard
can be done before adding the onions or can be kept aside and added in the end.

3. Turmeric Powder is used by me extensively for its medicinal value but for certain
    dishes, I avoid it to maintain the white colour of the dish as my mother in law does.
    Similarly for this pachadi also , turmeric powder is not used by me.

4. Tomatoes can also be used and the quantity of the tamarind can be reduced.


Thursday, July 11, 2013

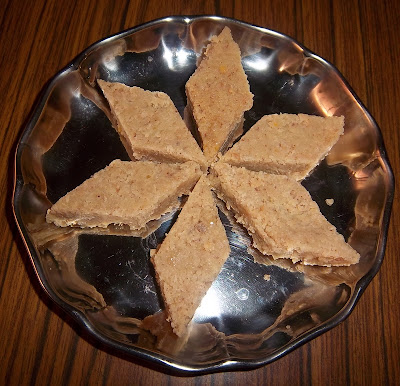
Coconut and Milk Barfi

                                        This sweet is slightly different from the traditional Coconut Barfi. Milk is added which gives a very rich taste. Some patience is required as the milk has to thicken but the sweet is worth the time and tolerance.

Preparation Time  : 30 minutes.
Finished Product    : 400 gms.
                                    
Coconut and Milk Barfi


Ingredients :

Grated coconut             1 cup
Milk                               1.25 cups
Sugar                              1 cup
Ghee                               3  tbsp
Besan Flour / Kadalai Mavoo    3 tsp.

Method :

1. Grind the grated coconut to a fine texture in the mixi with little milk.Grease a tray with ghee.Dissolve the besan flour in 2 tbsp. of milk.

2. In a thick bottomed and wide tawa, preferably non stick for the beginners, mix all the ingredients except besan flour and keep it on a low fire stirring now and then.

3. After 20 minutes the mixture starts slightly thickening and still keep on stirring.

4. With constant stirring, add the besan flour dissolved in milk.

6. Increase the flame and stir well. When the mixture becomes very thick, leaves the sides of the vessel with a porous texture and collects together like a ball, switch off the flame and tranfer it to the greased tray. 

7. Spread it well to the entire tray using a flat bottomed cup  greased at the bottom.

8. Cut it into desired shapes and turn it upside down on a big plate and separate the pieces.The rich milk, sugar , ghee sweet is ready.

Note :

1. Before the mixture thickens well, the hot mixture may spill on the hands while stirring, if the flame is high. So it is better to reduce the flame till it a very thick stage, prior to the final stage.

2. As always prefer the diamond shapes, for the above ingredients, a round plate of 8 - 10
     inches is ideal. The pieces can be very thin like the Kaju Katlis .

3. The final consistency may always be uncertain for the beginners but may become
     simple after 1 or 2 attempts. The mixture has to become very thick, a stage after
     the consistency of the Mysore Pak.


Monday, July 8, 2013

Sattur Kara Sevu

                             As Halwa is synonymous with Tirunelvei, my hometown, Kara Sevu is always identified with  Sattur, the hometown of my spouse .Sattur is also my hometown now for the past three decades after our marriage. An exclusive post has been dedicated to Sattur, under the title, SATTUR, OUR TOWN, OUR PRIDE in my other blog, Stoppingbythewords.blogspot.com. where my recollections and travels are recorded.
                           Preparing Kara Sevu, that week ,was in my mind and the article in,The Hindu dated, Sunday, June 23. 2013, In search of Sattur Sevu, under the column, Food safari, a fortnightly feature in the Magazine Section of The Hindu, published on Sundays made us very happy and proud.We never return from Sattur without a bagful of Sevu from Chanmuga Nadar Kadai, ( Shanmuga Nadar Shop is colloquially called so. ) for us and for our friends and relatives.So also all the other visitors to Sattur and the local people.
                                   Normally we add garlic and red chilly.At times, pepper is added instead of red chilly and garlic for a change.This time, one important tip could be got from the article.That is the  mixing of two oils, refined oil and coconut oil, which set their brand apart as  truly claimed by them.It is also a secret of their crispy and munchy Chevu, which I tried on the same day.Though we have been making chevus for many years, this time, with the combination of the two oils, it was perfect, giving me joy and pride.
                                   A big thanks to the shop and my favourite daily, The Hindu.


Sattur Kara Sevu


Ingredients :

Channa Dhal Flour / Kadalai Mavu              2 cups
Rice Flour                           1/2 cup
Zeera / Cummin Seeds         1 tsp.
Chilli Powder                    1 tsp.
Garlic Pods              10
Salt, Turmeric Powder, Hing
Coconut Oil  1 cup.
Any refined oil    2 cups


Method :

1. Sieve the flours and in a mixer grind the Garlic and Cummin seeds. As the quantity is less,add some water.See that it is free from the outer sheath of the garlic which may block the holes.

2. Mix well all the ingredients together by adding water. The consistency of the dough is similar to that of the Murukku dough, neither very hard nor very loose.

3.Heat the oil and press the dough in the oil like one whole big circlular piece using the Murukku mould.

4. When one side is cooked, turn it to the other side and remove from oil after the bubbles disappear.Break into small pieces when it cools.

Note :

1. Preparing Karasevu , I feel,is easier and faster than Murukku, as Murukku has to be made as separate pieces whereas  Karasevu and Omapodi is one single piece.So turning to the other side and removing from oil is easy.Of course, it has to be pressed perfectly into a single piece without  the dough, giving out extra small pieces.

2. When the two oils are mixed, there is a chance of the oil frothing, that is forming foams and the oil coming out of the vessel.So use a broad and little deep tawa.This is very important.The ratio of the oils was not given in the recipe.But I used sunflower and coconut oil in the ratio of 3:1.If there is no stock of coconut oil, use only refined oil.

3. Only the mixing of the oils gives the unique taste to the Sevu, being crisp after it cools.

4. In the early days, we used to prepare the Sevu by scratching the dough on a perforated tin sheet fixed on two wooden planks, the Sevu would fall in the oil in separate shreds Nowadays, with the small quantity, we use the Murukku mould where one big Kara Sevu has to be broken into small pieces.

5. Earlier we added butter and the sevu was soft but not crispy like the sevu of  Shanmuga Nadar's shop.  Now it is, ahaa, yenna rusi !